Chapter 2. Installing FreeBSD

2.1. Synopsis

There are several different ways of getting FreeBSD to run, depending on the environment. Those are:

  • Virtual Machine images, to download and import on a virtual environment of choice. These can be downloaded from the Download FreeBSD page. There are images for KVM ("qcow2"), VMWare ("vmdk"), Hyper-V ("vhd"), and raw device images that are universally supported. These are not installation images, but rather the preconfigured ("already installed") instances, ready to run and perform post-installation tasks.

  • Virtual Machine images available at Amazon’s AWS Marketplace, Microsoft Azure Marketplace, and Google Cloud Platform, to run on their respective hosting services. For more information on deploying FreeBSD on Azure please consult the relevant chapter in the Azure Documentation.

  • SD card images, for embedded systems such as Raspberry Pi or BeagleBone Black. These can be downloaded from the Download FreeBSD page. These files must be uncompressed and written as a raw image to an SD card, from which the board will then boot.

  • Installation images, to install FreeBSD on a hard drive for the usual desktop, laptop, or server systems.

The rest of this chapter describes the fourth case, explaining how to install FreeBSD using the text-based installation program named bsdinstall.

In general, the installation instructions in this chapter are written for the i386™ and AMD64 architectures. Where applicable, instructions specific to other platforms will be listed. There may be minor differences between the installer and what is shown here, so use this chapter as a general guide rather than as a set of literal instructions.

Users who prefer to install FreeBSD using a graphical installer may be interested in GhostBSD, MidnightBSD or NomadBSD.

After reading this chapter, you will know:

  • The minimum hardware requirements and FreeBSD supported architectures.

  • How to create the FreeBSD installation media.

  • How to start bsdinstall.

  • The questions bsdinstall will ask, what they mean, and how to answer them.

  • How to troubleshoot a failed installation.

  • How to access a live version of FreeBSD before committing to an installation.

Before reading this chapter, you should:

  • Read the supported hardware list that shipped with the version of FreeBSD to be installed and verify that the system’s hardware is supported.

2.2. Minimum Hardware Requirements

The hardware requirements to install FreeBSD vary by architecture. Hardware architectures and devices supported by a FreeBSD release are listed on the FreeBSD Release Information page. The FreeBSD download page also has recommendations for choosing the correct image for different architectures.

A FreeBSD installation requires a minimum of 96 MB of RAM and 1.5 GB of free hard drive space. However, such small amounts of memory and disk space are really only suitable for custom applications like embedded appliances. General-purpose desktop systems need more resources. 2-4 GB RAM and at least 8 GB hard drive space is a good starting point.

These are the processor requirements for each architecture:

amd64

This is the most common desktop and laptop processor type, used in most modern systems. Intel® calls it Intel64. Other manufacturers sometimes call it x86-64.

Examples of amd64 compatible processors include: AMD Athlon™64, AMD Opteron™, multi-core Intel® Xeon™, and Intel® Core™ 2 and later processors.

i386

Older desktops and laptops often use this 32-bit, x86 architecture.

Almost all i386-compatible processors with a floating point unit are supported. All Intel® processors 486 or higher are supported. However, binaries released by the project are compiled for the 686 processor, so a special build will be needed for 486 and 586 systems.

FreeBSD will take advantage of Physical Address Extensions (PAE) support on CPUs with this feature. A kernel with the PAE feature enabled will detect memory above 4 GB and allow it to be used by the system. However, using PAE places constraints on device drivers and other features of FreeBSD.

arm64

Most embedded boards are 64-bit ARM computers. A number of arm64 servers are supported.

arm

Older armv7 boards are supported.

powerpc

All New World ROM Apple® Mac® systems with built-in USB are supported. SMP is supported on machines with multiple CPUs.

A 32-bit kernel can only use the first 2 GB of RAM.

2.3. Pre-Installation Tasks

Once it has been determined that the system meets the minimum hardware requirements for installing FreeBSD, the installation file should be downloaded and the installation media prepared. Before doing this, check that the system is ready for an installation by verifying the items in this checklist:

  1. Back Up Important Data

    Before installing any operating system, always backup all important data first. Do not store the backup on the system being installed. Instead, save the data to a removable disk such as a USB drive, another system on the network, or an online backup service. Test the backup before starting the installation to make sure it contains all of the needed files. Once the installer formats the system’s disk, all data stored on that disk will be lost.

  2. Decide Where to Install FreeBSD

    If FreeBSD will be the only operating system installed, this step can be skipped. But if FreeBSD will share the disk with another operating system, decide which disk or partition will be used for FreeBSD.

    In the i386 and amd64 architectures, disks can be divided into multiple partitions using one of two partitioning schemes. A traditional Master Boot Record (MBR) holds a partition table defining up to four primary partitions. For historical reasons, FreeBSD calls these primary partition slices. One of these primary partitions can be made into an extended partition containing multiple logical partitions. The GUID Partition Table (GPT) is a newer and simpler method of partitioning a disk. Common GPT implementations allow up to 128 partitions per disk, eliminating the need for logical partitions.

    The FreeBSD boot loader requires either a primary or GPT partition. If all of the primary or GPT partitions are already in use, one must be freed for FreeBSD. To create a partition without deleting existing data, use a partition resizing tool to shrink an existing partition and create a new partition using the freed space.

    A variety of free and commercial partition resizing tools are listed at http://en.wikipedia.org/wiki/List_of_disk_partitioning_software. GParted Live (http://gparted.sourceforge.net/livecd.php) is a free live CD which includes the GParted partition editor. GParted is also included with many other Linux live CD distributions.

    When used properly, disk shrinking utilities can safely create space for creating a new partition. Since the possibility of selecting the wrong partition exists, always backup any important data and verify the integrity of the backup before modifying disk partitions.

    Disk partitions containing different operating systems make it possible to install multiple operating systems on one computer. An alternative is to use virtualization (Virtualization) which allows multiple operating systems to run at the same time without modifying any disk partitions.

  3. Collect Network Information

    Some FreeBSD installation methods require a network connection in order to download the installation files. After any installation, the installer will offer to setup the system’s network interfaces.

    If the network has a DHCP server, it can be used to provide automatic network configuration. If DHCP is not available, the following network information for the system must be obtained from the local network administrator or Internet service provider:

    Required Network Information

    1. IP address

    2. Subnet mask

    3. IP address of default gateway

    4. Domain name of the network

    5. IP addresses of the network’s DNS servers

  4. Check for FreeBSD Errata

    Although the FreeBSD Project strives to ensure that each release of FreeBSD is as stable as possible, bugs occasionally creep into the process. On very rare occasions those bugs affect the installation process. As these problems are discovered and fixed, they are noted in the FreeBSD Errata (https://www.freebsd.org/releases/12.1R/errata/) on the FreeBSD web site. Check the errata before installing to make sure that there are no problems that might affect the installation.

    Information and errata for all the releases can be found on the release information section of the FreeBSD web site (https://www.freebsd.org/releases/).

2.3.1. Prepare the Installation Media

The FreeBSD installer is not an application that can be run from within another operating system. Instead, download a FreeBSD installation file, burn it to the media associated with its file type and size (CD, DVD, or USB), and boot the system to install from the inserted media.

FreeBSD installation files are available at www.freebsd.org/where/. Each installation file’s name includes the release version of FreeBSD, the architecture, and the type of file. For example, to install FreeBSD 12.1 on an amd64 system from a DVD, download FreeBSD-12.1-RELEASE-amd64-dvd1.iso, burn this file to a DVD, and boot the system with the DVD inserted.

Installation files are available in several formats. The formats vary depending on computer architecture and media type.

Additional installation files are included for computers that boot with UEFI (Unified Extensible Firmware Interface). The names of these files include the string uefi.

File types:

  • -bootonly.iso: This is the smallest installation file as it only contains the installer. A working Internet connection is required during installation as the installer will download the files it needs to complete the FreeBSD installation. This file should be burned to a CD using a CD burning application.

  • -disc1.iso: This file contains all of the files needed to install FreeBSD, its source, and the Ports Collection. It should be burned to a CD using a CD burning application.

  • -dvd1.iso: This file contains all of the files needed to install FreeBSD, its source, and the Ports Collection. It also contains a set of popular binary packages for installing a window manager and some applications so that a complete system can be installed from media without requiring a connection to the Internet. This file should be burned to a DVD using a DVD burning application.

  • -memstick.img: This file contains all of the files needed to install FreeBSD, its source, and the Ports Collection. It should be burned to a USB stick using the instructions below.

  • -mini-memstick.img: Like -bootonly.iso, does not include installation files, but downloads them as needed. A working internet connection is required during installation. Write this file to a USB stick as shown in Writing an Image File to USB.

After downloading the image file, download CHECKSUM.SHA256 from the same directory. Calculate a checksum for the image file. FreeBSD provides sha256(1) for this, used as sha256 imagefilename. Other operating systems have similar programs.

Compare the calculated checksum with the one shown in CHECKSUM.SHA256. The checksums must match exactly. If the checksums do not match, the image file is corrupt and must be downloaded again.

2.3.1.1. Writing an Image File to USB

The *.img file is an image of the complete contents of a memory stick. It cannot be copied to the target device as a file. Several applications are available for writing the *.img to a USB stick. This section describes two of these utilities.

Before proceeding, back up any important data on the USB stick. This procedure will erase the existing data on the stick.

Procedure. Using dd to Write the Image

This example uses /dev/da0 as the target device where the image will be written. Be very careful that the correct device is used as this command will destroy the existing data on the specified target device.

  1. The command-line utility is available on BSD, Linux®, and Mac OS® systems. To burn the image using dd, insert the USB stick and determine its device name. Then, specify the name of the downloaded installation file and the device name for the USB stick. This example burns the amd64 installation image to the first USB device on an existing FreeBSD system.

    # dd if=FreeBSD-12.1-RELEASE-amd64-memstick.img of=/dev/da0 bs=1M conv=sync

    If this command fails, verify that the USB stick is not mounted and that the device name is for the disk, not a partition. Some operating systems might require this command to be run with sudo(8). The dd(1) syntax varies slightly across different platforms; for example, Mac OS® requires a lower-case bs=1m. Systems like Linux® might buffer writes. To force all writes to complete, use sync(8).

Procedure. Using Windows® to Write the Image

Be sure to give the correct drive letter as the existing data on the specified drive will be overwritten and destroyed.

  1. Obtaining Image Writer for Windows®

    Image Writer for Windows® is a free application that can correctly write an image file to a memory stick. Download it from https://sourceforge.net/projects/win32diskimager/ and extract it into a folder.

  2. Writing the Image with Image Writer

    Double-click the Win32DiskImager icon to start the program. Verify that the drive letter shown under Device is the drive with the memory stick. Click the folder icon and select the image to be written to the memory stick. Click Save to accept the image file name. Verify that everything is correct, and that no folders on the memory stick are open in other windows. When everything is ready, click Write to write the image file to the memory stick.

You are now ready to start installing FreeBSD.

2.4. Starting the Installation

By default, the installation will not make any changes to the disk(s) before the following message:

Your changes will now be written to disk. If you
have chosen to overwrite existing data, it will
be PERMANENTLY ERASED. Are you sure you want to
commit your changes?

The install can be exited at any time prior to this warning. If there is a concern that something is incorrectly configured, just turn the computer off before this point and no changes will be made to the system’s disks.

This section describes how to boot the system from the installation media which was prepared using the instructions in Prepare the Installation Media. When using a bootable USB stick, plug in the USB stick before turning on the computer. When booting from CD or DVD, turn on the computer and insert the media at the first opportunity. How to configure the system to boot from the inserted media depends upon the architecture.

2.4.1. Booting on i386™ and amd64

These architectures provide a BIOS menu for selecting the boot device. Depending upon the installation media being used, select the CD/DVD or USB device as the first boot device. Most systems also provide a key for selecting the boot device during startup without having to enter the BIOS. Typically, the key is either F10, F11, F12, or Escape.

If the computer loads the existing operating system instead of the FreeBSD installer, then either:

  1. The installation media was not inserted early enough in the boot process. Leave the media inserted and try restarting the computer.

  2. The BIOS changes were incorrect or not saved. Double-check that the right boot device is selected as the first boot device.

  3. This system is too old to support booting from the chosen media. In this case, the Plop Boot Manager (http://www.plop.at/en/bootmanagers.html) can be used to boot the system from the selected media.

2.4.2. Booting on PowerPC®

On most machines, holding C on the keyboard during boot will boot from the CD. Otherwise, hold Command+Option+O+F, or Windows+Alt+O+F on non-Apple® keyboards. At the 0 > prompt, enter

 boot cd:,\ppc\loader cd:0

2.4.3. FreeBSD Boot Menu

Once the system boots from the installation media, a menu similar to the following will be displayed:

bsdinstall newboot loader menu
Figure 1. FreeBSD Boot Loader Menu

By default, the menu will wait ten seconds for user input before booting into the FreeBSD installer or, if FreeBSD is already installed, before booting into FreeBSD. To pause the boot timer in order to review the selections, press Space. To select an option, press its highlighted number, character, or key. The following options are available.

  • Boot Multi User: This will continue the FreeBSD boot process. If the boot timer has been paused, press 1, upper- or lower-case B, or Enter.

  • Boot Single User: This mode can be used to fix an existing FreeBSD installation as described in “Single-User Mode”. Press 2 or the upper- or lower-case S to enter this mode.

  • Escape to loader prompt: This will boot the system into a repair prompt that contains a limited number of low-level commands. This prompt is described in “Stage Three”. Press 3 or Esc to boot into this prompt.

  • Reboot: Reboots the system.

  • Kernel: Loads a different kernel.

  • Configure Boot Options: Opens the menu shown in, and described under, FreeBSD Boot Options Menu.

bsdinstall boot options menu
Figure 2. FreeBSD Boot Options Menu

The boot options menu is divided into two sections. The first section can be used to either return to the main boot menu or to reset any toggled options back to their defaults.

The next section is used to toggle the available options to On or Off by pressing the option’s highlighted number or character. The system will always boot using the settings for these options until they are modified. Several options can be toggled using this menu:

  • ACPI Support: If the system hangs during boot, try toggling this option to Off.

  • Safe Mode: If the system still hangs during boot even with ACPI Support set to Off, try setting this option to On.

  • Single User: Toggle this option to On to fix an existing FreeBSD installation as described in “Single-User Mode”. Once the problem is fixed, set it back to Off.

  • Verbose: Toggle this option to On to see more detailed messages during the boot process. This can be useful when troubleshooting a piece of hardware.

After making the needed selections, press 1 or Backspace to return to the main boot menu, then press Enter to continue booting into FreeBSD. A series of boot messages will appear as FreeBSD carries out its hardware device probes and loads the installation program. Once the boot is complete, the welcome menu shown in Welcome Menu will be displayed.

bsdinstall choose mode
Figure 3. Welcome Menu

Press Enter to select the default of Install to enter the installer. The rest of this chapter describes how to use this installer. Otherwise, use the right or left arrows or the colorized letter to select the desired menu item. The Shell can be used to access a FreeBSD shell in order to use command line utilities to prepare the disks before installation. The Live CD option can be used to try out FreeBSD before installing it. The live version is described in Using the Live CD.

To review the boot messages, including the hardware device probe, press the upper- or lower-case S and then Enter to access a shell. At the shell prompt, type more /var/run/dmesg.boot and use the space bar to scroll through the messages. When finished, type exit to return to the welcome menu.

2.5. Using bsdinstall

This section shows the order of the bsdinstall menus and the type of information that will be asked before the system is installed. Use the arrow keys to highlight a menu option, then Space to select or deselect that menu item. When finished, press Enter to save the selection and move onto the next screen.

2.5.1. Selecting the Keymap Menu

Before starting the process, bsdinstall will load the keymap files as show in Keymap Loading.

bsdinstall keymap loading
Figure 4. Keymap Loading

After the keymaps have been loaded bsdinstall displays the menu shown in Keymap Selection Menu. Use the up and down arrows to select the keymap that most closely represents the mapping of the keyboard attached to the system. Press Enter to save the selection.

bsdinstall keymap 10
Figure 5. Keymap Selection Menu

Pressing Esc will exit this menu and use the default keymap. If the choice of keymap is not clear, United States of America ISO-8859-1 is also a safe option.

In addition, when selecting a different keymap, the user can try the keymap and ensure it is correct before proceeding as shown in Keymap Testing Menu.

bsdinstall keymap testing
Figure 6. Keymap Testing Menu

2.5.2. Setting the Hostname

The next bsdinstall menu is used to set the hostname for the newly installed system.

bsdinstall config hostname
Figure 7. Setting the Hostname

Type in a hostname that is unique for the network. It should be a fully-qualified hostname, such as machine3.example.com.

2.5.3. Selecting Components to Install

Next, bsdinstall will prompt to select optional components to install.

bsdinstall config components
Figure 8. Selecting Components to Install

Deciding which components to install will depend largely on the intended use of the system and the amount of disk space available. The FreeBSD kernel and userland, collectively known as the base system, are always installed. Depending on the architecture, some of these components may not appear:

  • base-dbg - Base tools like cat, ls among many others with debug symbols activated.

  • kernel-dbg - Kernel and modules with debug symbols activated.

  • lib32-dbg - Compatibility libraries for running 32-bit applications on a 64-bit version of FreeBSD with debug symbols activated.

  • lib32 - Compatibility libraries for running 32-bit applications on a 64-bit version of FreeBSD.

  • ports - The FreeBSD Ports Collection is a collection of files which automates the downloading, compiling and installation of third-party software packages. Installing Applications: Packages and Ports discusses how to use the Ports Collection.

    The installation program does not check for adequate disk space. Select this option only if sufficient hard disk space is available. The FreeBSD Ports Collection takes up about 500 MB of disk space.

  • src - The complete FreeBSD source code for both the kernel and the userland. Although not required for the majority of applications, it may be required to build device drivers, kernel modules, or some applications from the Ports Collection. It is also used for developing FreeBSD itself. The full source tree requires 1 GB of disk space and recompiling the entire FreeBSD system requires an additional 5 GB of space.

  • tests - FreeBSD Test Suite.

2.5.4. Installing from the Network

The menu shown in Installing from the Network only appears when installing from a -bootonly.iso or -mini-memstick.img as this installation media does not hold copies of the installation files. Since the installation files must be retrieved over a network connection, this menu indicates that the network interface must be configured first. If this menu is shown in any step of the process remember to follow the instructions in Configuring Network Interfaces.

bsdinstall netinstall files
Figure 9. Installing from the Network

2.6. Allocating Disk Space

The next menu is used to determine the method for allocating disk space.

bsdinstall zfs partmenu
Figure 10. Partitioning Choices

bsdinstall gives the user four methods for allocating disk space:

  • Auto (UFS) partitioning automatically sets up the disk partitions using the UFS file system.

  • Manual partitioning allows advanced users to create customized partitions from menu options.

  • Shell opens a shell prompt where advanced users can create customized partitions using command-line utilities like gpart(8), fdisk(8), and bsdlabel(8).

  • Auto (ZFS) partitioning creates a root-on-ZFS system with optional GELI encryption support for boot environments.

This section describes what to consider when laying out the disk partitions. It then demonstrates how to use the different partitioning methods.

2.6.1. Designing the Partition Layout

When laying out file systems, remember that hard drives transfer data faster from the outer tracks to the inner. Thus, smaller and heavier-accessed file systems should be closer to the outside of the drive, while larger partitions like /usr should be placed toward the inner parts of the disk. It is a good idea to create partitions in an order similar to: /, swap, /var, and /usr.

The size of the /var partition reflects the intended machine’s usage. This partition is used to hold mailboxes, log files, and printer spools. Mailboxes and log files can grow to unexpected sizes depending on the number of users and how long log files are kept. On average, most users rarely need more than about a gigabyte of free disk space in /var.

Sometimes, a lot of disk space is required in /var/tmp. When new software is installed, the packaging tools extract a temporary copy of the packages under /var/tmp. Large software packages, like Firefox or LibreOffice may be tricky to install if there is not enough disk space under /var/tmp.

The /usr partition holds many of the files which support the system, including the FreeBSD Ports Collection and system source code. At least 2 gigabytes of space is recommended for this partition.

When selecting partition sizes, keep the space requirements in mind. Running out of space in one partition while barely using another can be a hassle.

As a rule of thumb, the swap partition should be about double the size of physical memory (RAM). Systems with minimal RAM may perform better with more swap. Configuring too little swap can lead to inefficiencies in the VM page scanning code and might create issues later if more memory is added.

On larger systems with multiple SCSI disks or multiple IDE disks operating on different controllers, it is recommended that swap be configured on each drive, up to four drives. The swap partitions should be approximately the same size. The kernel can handle arbitrary sizes but internal data structures scale to 4 times the largest swap partition. Keeping the swap partitions near the same size will allow the kernel to optimally stripe swap space across disks. Large swap sizes are fine, even if swap is not used much. It might be easier to recover from a runaway program before being forced to reboot.

By properly partitioning a system, fragmentation introduced in the smaller write heavy partitions will not bleed over into the mostly read partitions. Keeping the write loaded partitions closer to the disk’s edge will increase I/O performance in the partitions where it occurs the most. While I/O performance in the larger partitions may be needed, shifting them more toward the edge of the disk will not lead to a significant performance improvement over moving /var to the edge.

2.6.2. Guided Partitioning Using UFS

When this method is selected, a menu will display the available disk(s). If multiple disks are connected, choose the one where FreeBSD is to be installed.

bsdinstall part guided disk
Figure 11. Selecting from Multiple Disks

Once the disk is selected, the next menu prompts to install to either the entire disk or to create a partition using free space. If Entire Disk is chosen, a general partition layout filling the whole disk is automatically created. Selecting Partition creates a partition layout from the unused space on the disk.

bsdinstall part entire part
Figure 12. Selecting Entire Disk or Partition

After Entire Disk is chosen bsdinstall displays a dialog indicating that the disk will be erased.

bsdinstall ufs warning
Figure 13. Confirmation

The next menu shows a list with the partition schemes types. GPT is usually the most appropriate choice for amd64 computers. Older computers that are not compatible with GPT should use MBR. The other partition schemes are generally used for uncommon or older computers. More information is available in Partitioning Schemes.

bsdinstall part manual partscheme
Figure 14. Select Partition Scheme

After the partition layout has been created, review it to ensure it meets the needs of the installation. Selecting Revert will reset the partitions to their original values and pressing Auto will recreate the automatic FreeBSD partitions. Partitions can also be manually created, modified, or deleted. When the partitioning is correct, select Finish to continue with the installation.

bsdinstall part review
Figure 15. Review Created Partitions

Once the disks are configured, the next menu provides the last chance to make changes before the selected drives are formatted. If changes need to be made, select Back to return to the main partitioning menu. Revert & Exit exits the installer without making any changes to the drive. Select Commit to start the installation process.

bsdinstall final confirmation
Figure 16. Final Confirmation

To continue with the installation process go to Fetching Distribution Files.

2.6.3. Manual Partitioning

Selecting this method opens the partition editor:

bsdinstall part manual create
Figure 17. Manually Create Partitions

Highlight the installation drive (ada0 in this example) and select Create to display a menu of available partition schemes:

bsdinstall part manual partscheme
Figure 18. Manually Create Partitions

GPT is usually the most appropriate choice for amd64 computers. Older computers that are not compatible with GPT should use MBR. The other partition schemes are generally used for uncommon or older computers.

Table 1. Partitioning Schemes
AbbreviationDescription

APM

Apple Partition Map, used by PowerPC®.

BSD

BSD label without an MBR, sometimes called dangerously dedicated mode as non-BSD disk utilities may not recognize it.

GPT

GUID Partition Table (http://en.wikipedia.org/wiki/GUID_Partition_Table).

MBR

Master Boot Record (http://en.wikipedia.org/wiki/Master_boot_record).

After the partitioning scheme has been selected and created, select Create again to create the partitions. The Tab key is used to move the cursor between fields.

bsdinstall part manual addpart
Figure 19. Manually Create Partitions

A standard FreeBSD GPT installation uses at least three partitions:

  • freebsd-boot - Holds the FreeBSD boot code.

  • freebsd-ufs - A FreeBSD UFS file system.

  • freebsd-zfs - A FreeBSD ZFS file system. More information about ZFS is available in The Z File System (ZFS).

  • freebsd-swap - FreeBSD swap space.

Refer to gpart(8) for descriptions of the available GPT partition types.

Multiple file system partitions can be created and some people prefer a traditional layout with separate partitions for /, /var, /tmp, and /usr. See Creating Traditional Split File System Partitions for an example.

The Size may be entered with common abbreviations: K for kilobytes, M for megabytes, or G for gigabytes.

Proper sector alignment provides the best performance, and making partition sizes even multiples of 4K bytes helps to ensure alignment on drives with either 512-byte or 4K-byte sectors. Generally, using partition sizes that are even multiples of 1M or 1G is the easiest way to make sure every partition starts at an even multiple of 4K. There is one exception: the freebsd-boot partition should be no larger than 512K due to current boot code limitations.

A Mountpoint is needed if the partition will contain a file system. If only a single UFS partition will be created, the mountpoint should be /.

The Label is a name by which the partition will be known. Drive names or numbers can change if the drive is connected to a different controller or port, but the partition label does not change. Referring to labels instead of drive names and partition numbers in files like /etc/fstab makes the system more tolerant to hardware changes. GPT labels appear in /dev/gpt/ when a disk is attached. Other partitioning schemes have different label capabilities and their labels appear in different directories in /dev/.

Use a unique label on every partition to avoid conflicts from identical labels. A few letters from the computer’s name, use, or location can be added to the label. For instance, use labroot or rootfslab for the UFS root partition on the computer named lab.

Example 1. Creating Traditional Split File System Partitions

For a traditional partition layout where the /, /var, /tmp, and /usr directories are separate file systems on their own partitions, create a GPT partitioning scheme, then create the partitions as shown. Partition sizes shown are typical for a 20G target disk. If more space is available on the target disk, larger swap or /var partitions may be useful. Labels shown here are prefixed with ex for "example", but readers should use other unique label values as described above.

By default, FreeBSD’s gptboot expects the first UFS partition to be the / partition.

Partition TypeSizeMountpointLabel

freebsd-boot

512K

freebsd-ufs

2G

/

exrootfs

freebsd-swap

4G

exswap

freebsd-ufs

2G

/var

exvarfs

freebsd-ufs

1G

/tmp

extmpfs

freebsd-ufs

accept the default (remainder of the disk)

/usr

exusrfs

After the custom partitions have been created, select Finish to continue with the installation and go to Fetching Distribution Files.

2.6.4. Guided Partitioning Using Root-on-ZFS

This partitioning mode only works with whole disks and will erase the contents of the entire disk. The main ZFS configuration menu offers a number of options to control the creation of the pool.

bsdinstall zfs menu
Figure 20. ZFS Partitioning Menu

Here is a summary of the options which can be used in this menu:

  • Install - Proceed with the installation with the selected options.

  • Pool Type/Disks - Allow to configure the Pool Type and the disk(s) that will constitute the pool. The automatic ZFS installer currently only supports the creation of a single top level vdev, except in stripe mode. To create more complex pools, use the instructions in Shell Mode Partitioning to create the pool.

  • Rescan Devices - Repopulate the list of available disks.

  • Disk Info - Disk Info menu can be used to inspect each disk, including its partition table and various other information such as the device model number and serial number, if available.

  • Pool Name - Establish the name of the pool. The default name is zroot.

  • Force 4K Sectors? - Force the use of 4K sectors. By default, the installer will automatically create partitions aligned to 4K boundaries and force ZFS to use 4K sectors. This is safe even with 512 byte sector disks, and has the added benefit of ensuring that pools created on 512 byte disks will be able to have 4K sector disks added in the future, either as additional storage space or as replacements for failed disks. Press the Enter key to chose to activate it or not.

  • Encrypt Disks? - Encrypting the disks allows the user to encrypt the disks using GELI. More information about disk encryption is available in “Disk Encryption with geli”. Press the Enter key to chose activate it or not.

  • Partition Scheme - Allow to choose the partition scheme. GPT is the recommended option in most cases. Press the Enter key to chose between the different options.

  • Swap Size - Establish the amount of swap space.

  • Mirror Swap? - Allows the user to mirror the swap between the disks. Be aware, enabling mirror swap will break crash dumps. Press the Enter key to activate it or not.

  • Encrypt Swap? - Allow the user the possibility to encrypt the swap. Encrypts the swap with a temporary key each time that the system boots and discards it on reboot. Press the Enter key to chose activate it or not. More information about swap encryption in “Encrypting Swap”.

Select T to configure the Pool Type and the disk(s) that will constitute the pool.

bsdinstall zfs vdev type
Figure 21. ZFS Pool Type

Here is a summary of the Pool Type which can be selected in this menu:

  • stripe - Striping provides maximum storage of all connected devices, but no redundancy. If just one disk fails the data on the pool is lost irrevocably.

  • mirror - Mirroring stores a complete copy of all data on every disk. Mirroring provides a good read performance because data is read from all disks in parallel. Write performance is slower as the data must be written to all disks in the pool. Allows all but one disk to fail. This option requires at least two disks.

  • raid10 - Striped mirrors. Provides the best performance, but the least storage. This option needs at least an even number of disks and a minimum of four disks.

  • raidz1 - Single Redundant RAID. Allow one disk to fail concurrently. This option needs at least three disks.

  • raidz2 - Double Redundant RAID. Allows two disks to fail concurrently. This option needs at least four disks.

  • raidz3 - Triple Redundant RAID. Allows three disks to fail concurrently. This option needs at least five disks.

Once a Pool Type has been selected, a list of available disks is displayed, and the user is prompted to select one or more disks to make up the pool. The configuration is then validated, to ensure enough disks are selected. If not, select <Change Selection> to return to the list of disks, or <Back> to change the Pool Type.

bsdinstall zfs disk select
Figure 22. Disk Selection
bsdinstall zfs vdev invalid
Figure 23. Invalid Selection

If one or more disks are missing from the list, or if disks were attached after the installer was started, select - Rescan Devices to repopulate the list of available disks.

bsdinstall zfs rescan devices
Figure 24. Rescan Devices

To avoid accidentally erasing the wrong disk, the - Disk Info menu can be used to inspect each disk, including its partition table and various other information such as the device model number and serial number, if available.

bsdinstall zfs disk info
Figure 25. Analyzing a Disk

Select N to configure the Pool Name. Enter the desired name then select <OK> to establish it or <Cancel> to return to the main menu and leave the default name.

bsdinstall zfs pool name
Figure 26. Pool Name

Select S to set the amount of swap. Enter the desired amount of swap and then select <OK> to establish it or <Cancel> to return to the main menu and let the default amount.

bsdinstall zfs swap amount
Figure 27. Swap Amount

Once all options have been set to the desired values, select the >>> Install option at the top of the menu. The installer then offers a last chance to cancel before the contents of the selected drives are destroyed to create the ZFS pool.

bsdinstall zfs warning
Figure 28. Last Chance

If GELI disk encryption was enabled, the installer will prompt twice for the passphrase to be used to encrypt the disks. And after that the initializing of the encryption begins.

bsdinstall zfs geli password
Figure 29. Disk Encryption Password
bsdinstall zfs init encription
Figure 30. Initializing Encryption

The installation then proceeds normally. To continue with the installation go to Fetching Distribution Files.

2.6.5. Shell Mode Partitioning

When creating advanced installations, the bsdinstall partitioning menus may not provide the level of flexibility required. Advanced users can select the Shell option from the partitioning menu in order to manually partition the drives, create the file system(s), populate /tmp/bsdinstall_etc/fstab, and mount the file systems under /mnt. Once this is done, type exit to return to bsdinstall and continue the installation.

2.7. Fetching Distribution Files

Installation time will vary depending on the distributions chosen, installation media, and speed of the computer. A series of messages will indicate the progress.

First, the installer formats the selected disk(s) and initializes the partitions. Next, in the case of a bootonly media or mini memstick, it downloads the selected components:

bsdinstall distfile fetching
Figure 31. Fetching Distribution Files

Next, the integrity of the distribution files is verified to ensure they have not been corrupted during download or misread from the installation media:

bsdinstall distfile verifying
Figure 32. Verifying Distribution Files

Finally, the verified distribution files are extracted to the disk:

bsdinstall distfile extracting
Figure 33. Extracting Distribution Files

Once all requested distribution files have been extracted, bsdinstall displays the first post-installation configuration screen. The available post-configuration options are described in the next section.

2.8. Accounts, Time Zone, Services and Hardening

2.8.1. Setting the root Password

First, the root password must be set. While entering the password, the characters being typed are not displayed on the screen. After the password has been entered, it must be entered again. This helps prevent typing errors.

bsdinstall post root passwd
Figure 34. Setting the root Password

2.8.2. Setting the Time Zone

The next series of menus are used to determine the correct local time by selecting the geographic region, country, and time zone. Setting the time zone allows the system to automatically correct for regional time changes, such as daylight savings time, and perform other time zone related functions properly.

The example shown here is for a machine located in the mainland time zone of Spain, Europe. The selections will vary according to the geographical location.

bsdinstall timezone region
Figure 35. Select a Region

The appropriate region is selected using the arrow keys and then pressing Enter.

bsdinstall timezone country
Figure 36. Select a Country

Select the appropriate country using the arrow keys and press Enter.

bsdinstall timezone zone
Figure 37. Select a Time Zone

The appropriate time zone is selected using the arrow keys and pressing Enter.

bsdinstall timezone confirm
Figure 38. Confirm Time Zone

Confirm the abbreviation for the time zone is correct.

bsdinstall timezone date
Figure 39. Select Date

The appropriate date is selected using the arrow keys and then pressing Set Date. Otherwise, the date selection can be skipped by pressing Skip.

bsdinstall timezone time
Figure 40. Select Time

The appropriate time is selected using the arrow keys and then pressing Set Time. Otherwise, the time selection can be skipped by pressing Skip.

2.8.3. Enabling Services

The next menu is used to configure which system services will be started whenever the system boots. All of these services are optional. Only start the services that are needed for the system to function.

bsdinstall config services
Figure 41. Selecting Additional Services to Enable

Here is a summary of the services which can be enabled in this menu:

  • local_unbound - Enable the DNS local unbound. It is necessary to keep in mind that this is the unbound of the base system and is only meant for use as a local caching forwarding resolver. If the objective is to set up a resolver for the entire network install dns/unbound.

  • sshd - The Secure Shell (SSH) daemon is used to remotely access a system over an encrypted connection. Only enable this service if the system should be available for remote logins.

  • moused - Enable this service if the mouse will be used from the command-line system console.

  • ntpdate - Enable the automatic clock synchronization at boot time. The functionality of this program is now available in the ntpd(8) daemon. After a suitable period of mourning, the ntpdate(8) utility will be retired.

  • ntpd - The Network Time Protocol (NTP) daemon for automatic clock synchronization. Enable this service if there is a Windows®, Kerberos, or LDAP server on the network.

  • powerd - System power control utility for power control and energy saving.

  • dumpdev - Enabling crash dumps is useful in debugging issues with the system, so users are encouraged to enable crash dumps.

2.8.4. Enabling Hardening Security Options

The next menu is used to configure which security options will be enabled. All of these options are optional. But their use is encouraged.

bsdinstall hardening
Figure 42. Selecting Hardening Security Options

Here is a summary of the options which can be enabled in this menu:

  • hide_uids - Hide processes running as other users to prevent the unprivileged users to see other running processes in execution by other users (UID) preventing information leakage.

  • hide_gids - Hide processes running as other groups to prevent the unprivileged users to see other running processes in execution by other groups (GID) preventing information leakage.

  • hide_jail - Hide processes running in jails to prevent the unprivileged users to see processes running inside the jails.

  • read_msgbuf - Disabling reading kernel message buffer for unprivileged users prevent from using dmesg(8) to view messages from the kernel’s log buffer.

  • proc_debug - Disabling process debugging facilities for unprivileged users disables a variety of unprivileged inter-process debugging services, including some procfs functionality, ptrace(), and ktrace(). Please note that this will also prevent debugging tools, for instance lldb(1), truss(1), procstat(1), as well as some built-in debugging facilities in certain scripting language like PHP, etc., from working for unprivileged users.

  • random_pid - Randomize the PID of newly created processes.

  • clear_tmp - Clean /tmp when the system starts up.

  • disable_syslogd - Disable opening syslogd network socket. By default FreeBSD runs syslogd in a secure way with -s. That prevents the daemon from listening for incoming UDP requests at port 514. With this option enabled syslogd will run with the flag -ss which prevents syslogd from opening any port. To get more information consult syslogd(8).

  • disable_sendmail - Disable the sendmail mail transport agent.

  • secure_console - When this option is enabled, the prompt requests the root password when entering single-user mode.

  • disable_ddtrace - DTrace can run in a mode that will actually affect the running kernel. Destructive actions may not be used unless they have been explicitly enabled. To enable this option when using DTrace use -w. To get more information consult dtrace(1).

2.8.5. Add Users

The next menu prompts to create at least one user account. It is recommended to login to the system using a user account rather than as root. When logged in as root, there are essentially no limits or protection on what can be done. Logging in as a normal user is safer and more secure.

Select Yes to add new users.

bsdinstall adduser1
Figure 43. Add User Accounts

Follow the prompts and input the requested information for the user account. The example shown in Enter User Information creates the asample user account.

bsdinstall adduser2
Figure 44. Enter User Information

Here is a summary of the information to input:

  • Username - The name the user will enter to log in. A common convention is to use the first letter of the first name combined with the last name, as long as each username is unique for the system. The username is case sensitive and should not contain any spaces.

  • Full name - The user’s full name. This can contain spaces and is used as a description for the user account.

  • Uid - User ID. Typically, this is left blank so the system will assign a value.

  • Login group - The user’s group. Typically this is left blank to accept the default.

  • Invite user into other groups? - Additional groups to which the user will be added as a member. If the user needs administrative access, type wheel here.

  • Login class - Typically left blank for the default.

  • Shell - Type in one of the listed values to set the interactive shell for the user. Refer to “Shells” for more information about shells.

  • Home directory - The user’s home directory. The default is usually correct.

  • Home directory permissions - Permissions on the user’s home directory. The default is usually correct.

  • Use password-based authentication? - Typically yes so that the user is prompted to input their password at login.

  • Use an empty password? - Typically no as it is insecure to have a blank password.

  • Use a random password? - Typically no so that the user can set their own password in the next prompt.

  • Enter password - The password for this user. Characters typed will not show on the screen.

  • Enter password again - The password must be typed again for verification.

  • Lock out the account after creation? - Typically no so that the user can login.

After entering everything, a summary is shown for review. If a mistake was made, enter no and try again. If everything is correct, enter yes to create the new user.

bsdinstall adduser3
Figure 45. Exit User and Group Management

If there are more users to add, answer the Add another user? question with yes. Enter no to finish adding users and continue the installation.

For more information on adding users and user management, see “Users and Basic Account Management”.

2.8.6. Final Configuration

After everything has been installed and configured, a final chance is provided to modify settings.

bsdinstall finalconfiguration
Figure 46. Final Configuration

Use this menu to make any changes or do any additional configuration before completing the installation.

After any final configuration is complete, select Exit.

bsdinstall final modification shell
Figure 47. Manual Configuration

bsdinstall will prompt if there are any additional configuration that needs to be done before rebooting into the new system. Select Yes to exit to a shell within the new system or No to proceed to the last step of the installation.

bsdinstall mainexit
Figure 48. Complete the Installation

If further configuration or special setup is needed, select Live CD to boot the install media into Live CD mode.

If the installation is complete, select Reboot to reboot the computer and start the new FreeBSD system. Do not forget to remove the FreeBSD install media or the computer may boot from it again.

As FreeBSD boots, informational messages are displayed. After the system finishes booting, a login prompt is displayed. At the login: prompt, enter the username added during the installation. Avoid logging in as root. Refer to “The Superuser Account” for instructions on how to become the superuser when administrative access is needed.

The messages that appeared during boot can be reviewed by pressing Scroll-Lock to turn on the scroll-back buffer. The PgUp, PgDn, and arrow keys can be used to scroll back through the messages. When finished, press Scroll-Lock again to unlock the display and return to the console. To review these messages once the system has been up for some time, type less /var/run/dmesg.boot from a command prompt. Press q to return to the command line after viewing.

If sshd was enabled in Selecting Additional Services to Enable, the first boot may be a bit slower as the system will generate the RSA and DSA keys. Subsequent boots will be faster. The fingerprints of the keys will be displayed, as seen in this example:

Generating public/private rsa1 key pair.
Your identification has been saved in /etc/ssh/ssh_host_key.
Your public key has been saved in /etc/ssh/ssh_host_key.pub.
The key fingerprint is:
10:a0:f5:af:93:ae:a3:1a:b2:bb:3c:35:d9:5a:b3:f3 root@machine3.example.com
The key's randomart image is:
+--[RSA1 1024]----+
|    o..          |
|   o . .         |
|  .   o          |
|       o         |
|    o   S        |
|   + + o         |
|o . + *          |
|o+ ..+ .         |
|==o..o+E         |
+-----------------+
Generating public/private dsa key pair.
Your identification has been saved in /etc/ssh/ssh_host_dsa_key.
Your public key has been saved in /etc/ssh/ssh_host_dsa_key.pub.
The key fingerprint is:
7e:1c:ce:dc:8a:3a:18:13:5b:34:b5:cf:d9:d1:47:b2 root@machine3.example.com
The key's randomart image is:
+--[ DSA 1024]----+
|       ..     . .|
|      o  .   . + |
|     . ..   . E .|
|    . .  o o . . |
|     +  S = .    |
|    +  . = o     |
|     +  . * .    |
|    . .  o .     |
|      .o. .      |
+-----------------+
Starting sshd.

Refer to OpenSSH for more information about fingerprints and SSH.

FreeBSD does not install a graphical environment by default. Refer to The X Window System for more information about installing and configuring a graphical window manager.

Proper shutdown of a FreeBSD computer helps protect data and hardware from damage. Do not turn off the power before the system has been properly shut down! If the user is a member of the wheel group, become the superuser by typing su at the command line and entering the root password. Then, type shutdown -p now and the system will shut down cleanly, and if the hardware supports it, turn itself off.

2.9. Network Interfaces

2.9.1. Configuring Network Interfaces

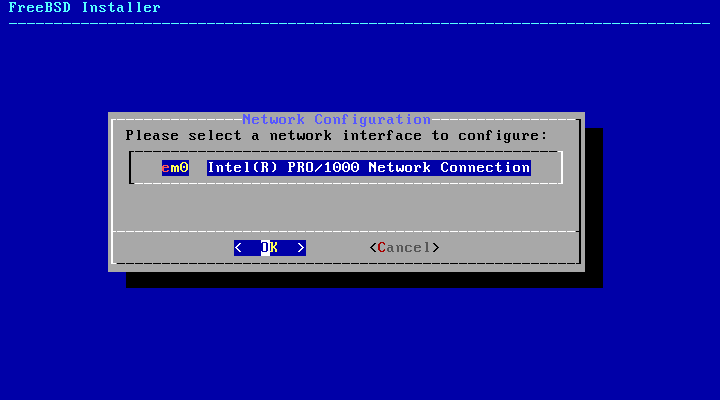
Next, a list of the network interfaces found on the computer is shown. Select the interface to configure.

bsdinstall configure network interface
Figure 49. Choose a Network Interface

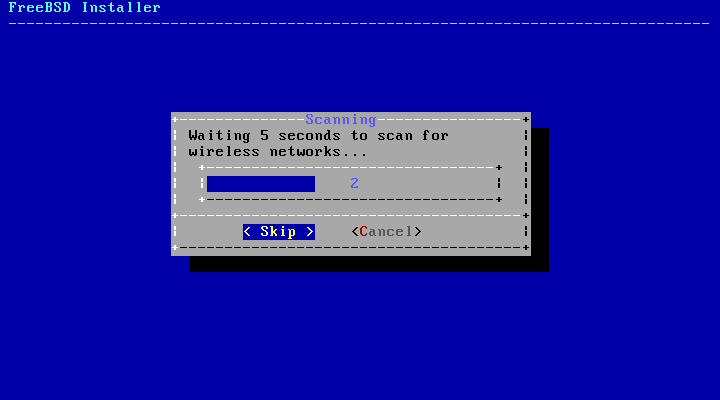
If an Ethernet interface is selected, the installer will skip ahead to the menu shown in Choose IPv4 Networking. If a wireless network interface is chosen, the system will instead scan for wireless access points:

bsdinstall configure wireless scan
Figure 50. Scanning for Wireless Access Points

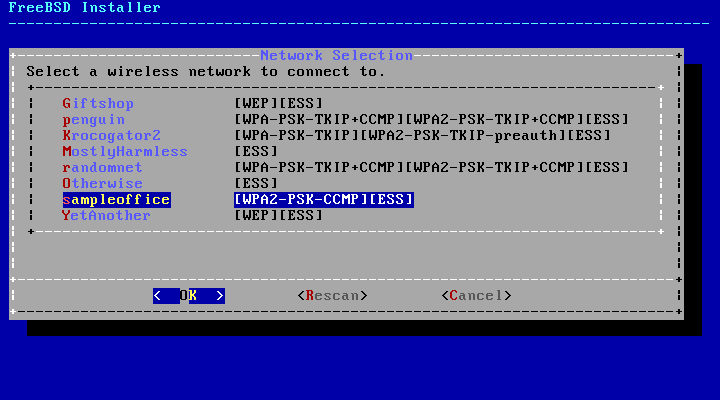
Wireless networks are identified by a Service Set Identifier (SSID), a short, unique name given to each network. SSIDs found during the scan are listed, followed by a description of the encryption types available for that network. If the desired SSID does not appear in the list, select Rescan to scan again. If the desired network still does not appear, check for problems with antenna connections or try moving the computer closer to the access point. Rescan after each change is made.

bsdinstall configure wireless accesspoints
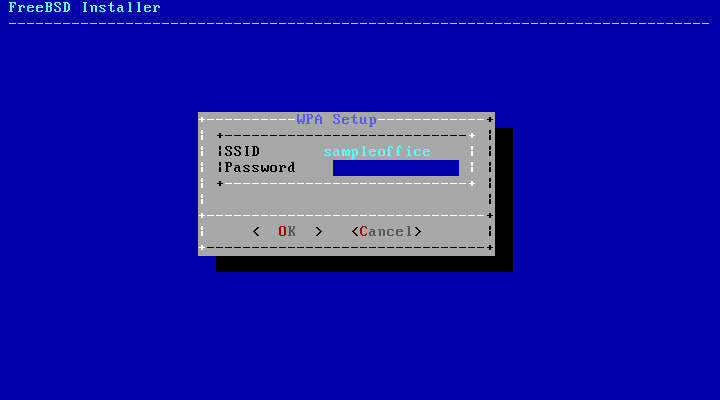
Figure 51. Choosing a Wireless Network

Next, enter the encryption information for connecting to the selected wireless network. WPA2 encryption is strongly recommended as older encryption types, like WEP, offer little security. If the network uses WPA2, input the password, also known as the Pre-Shared Key (PSK). For security reasons, the characters typed into the input box are displayed as asterisks.

bsdinstall configure wireless wpa2setup
Figure 52. WPA2 Setup

Next, choose whether or not an IPv4 address should be configured on the Ethernet or wireless interface:

bsdinstall configure network interface ipv4
Figure 53. Choose IPv4 Networking

There are two methods of IPv4 configuration. DHCP will automatically configure the network interface correctly and should be used if the network provides a DHCP server. Otherwise, the addressing information needs to be input manually as a static configuration.

Do not enter random network information as it will not work. If a DHCP server is not available, obtain the information listed in Required Network Information from the network administrator or Internet service provider.

If a DHCP server is available, select Yes in the next menu to automatically configure the network interface. The installer will appear to pause for a minute or so as it finds the DHCP server and obtains the addressing information for the system.

bsdinstall configure network interface ipv4 dhcp
Figure 54. Choose IPv4DHCP Configuration

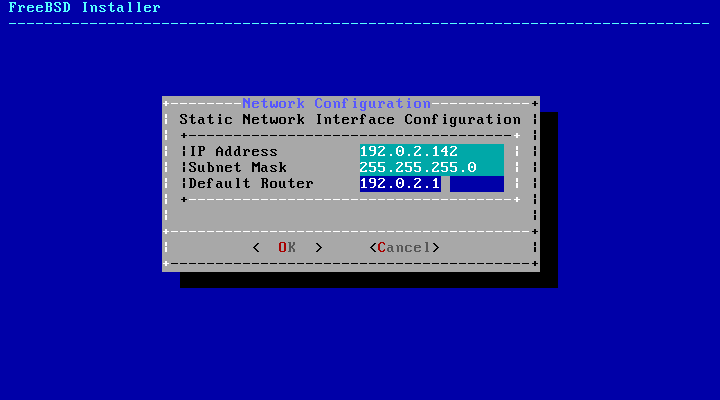
If a DHCP server is not available, select No and input the following addressing information in this menu:

bsdinstall configure network interface ipv4 static
Figure 55. IPv4 Static Configuration
  • IP Address - The IPv4 address assigned to this computer. The address must be unique and not already in use by another piece of equipment on the local network.

  • Subnet Mask - The subnet mask for the network.

  • Default Router - The IP address of the network’s default gateway.

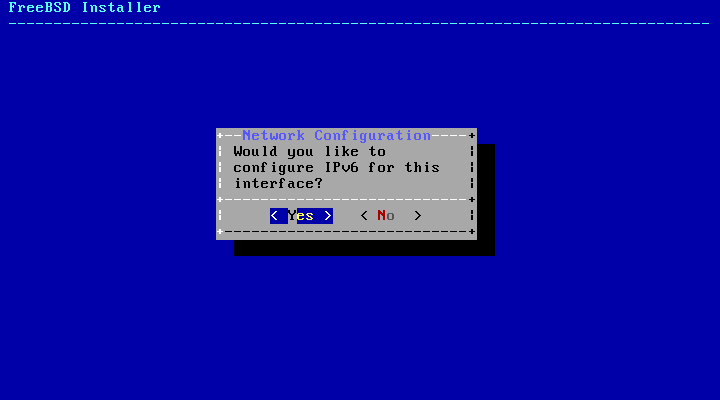
The next screen will ask if the interface should be configured for IPv6. If IPv6 is available and desired, choose Yes to select it.

bsdinstall configure network interface ipv6
Figure 56. Choose IPv6 Networking

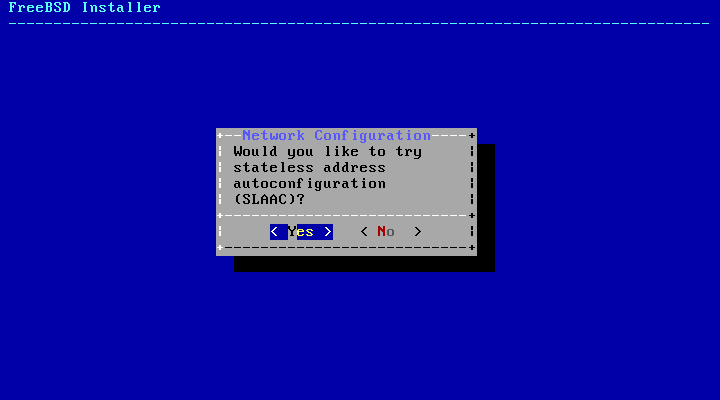
IPv6 also has two methods of configuration. StateLess Address AutoConfiguration (SLAAC) will automatically request the correct configuration information from a local router. Refer to rfc4862 for more information. Static configuration requires manual entry of network information.

If an IPv6 router is available, select Yes in the next menu to automatically configure the network interface. The installer will appear to pause for a minute or so as it finds the router and obtains the addressing information for the system.

bsdinstall configure network interface slaac
Figure 57. Choose IPv6 SLAAC Configuration

If an IPv6 router is not available, select No and input the following addressing information in this menu:

bsdinstall configure network interface ipv6 static
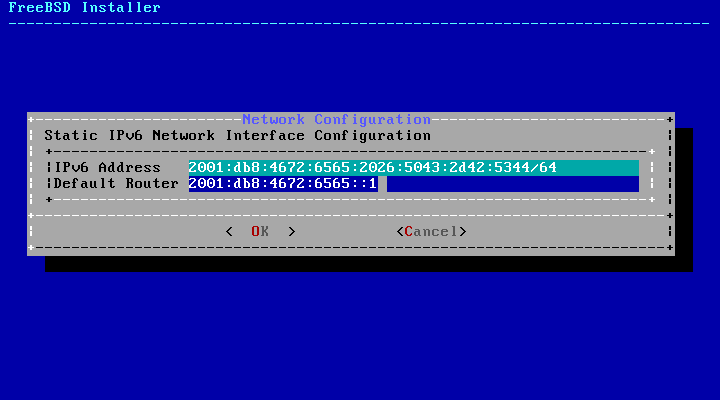
Figure 58. IPv6 Static Configuration
  • IPv6 Address - The IPv6 address assigned to this computer. The address must be unique and not already in use by another piece of equipment on the local network.

  • Default Router - The IPv6 address of the network’s default gateway.

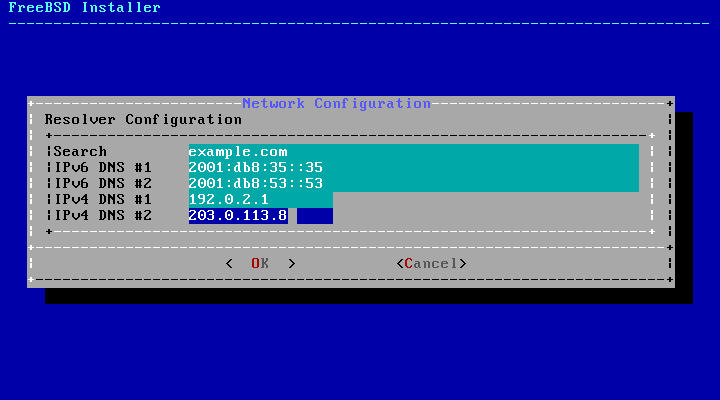
The last network configuration menu is used to configure the Domain Name System (DNS) resolver, which converts hostnames to and from network addresses. If DHCP or SLAAC was used to autoconfigure the network interface, the Resolver Configuration values may already be filled in. Otherwise, enter the local network’s domain name in the Search field. DNS #1 and DNS #2 are the IPv4 and/or IPv6 addresses of the DNS servers. At least one DNS server is required.

bsdinstall configure network ipv4 dns
Figure 59. DNS Configuration

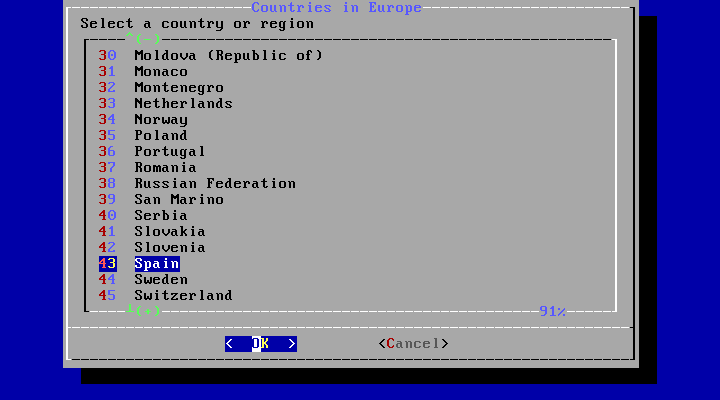
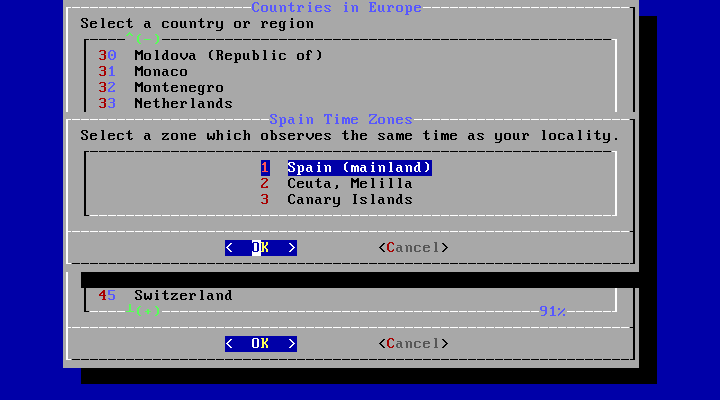
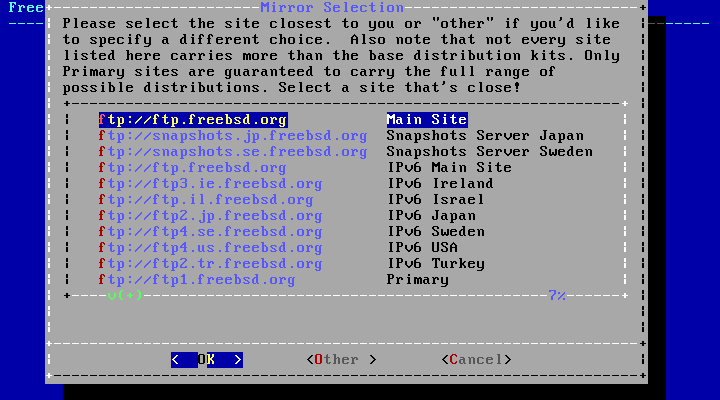
Once the interface is configured, select a mirror site that is located in the same region of the world as the computer on which FreeBSD is being installed. Files can be retrieved more quickly when the mirror is close to the target computer, reducing installation time.

bsdinstall netinstall mirrorselect
Figure 60. Choosing a Mirror

2.10. Troubleshooting

This section covers basic installation troubleshooting, such as common problems people have reported.

Check the Hardware Notes (https://www.freebsd.org/releases/) document for the version of FreeBSD to make sure the hardware is supported. If the hardware is supported and lock-ups or other problems occur, build a custom kernel using the instructions in Configuring the FreeBSD Kernel to add support for devices which are not present in the GENERIC kernel. The default kernel assumes that most hardware devices are in their factory default configuration in terms of IRQs, I/O addresses, and DMA channels. If the hardware has been reconfigured, a custom kernel configuration file can tell FreeBSD where to find things.

Some installation problems can be avoided or alleviated by updating the firmware on various hardware components, most notably the motherboard. Motherboard firmware is usually referred to as the BIOS. Most motherboard and computer manufacturers have a website for upgrades and upgrade information.

Manufacturers generally advise against upgrading the motherboard BIOS unless there is a good reason for doing so, like a critical update. The upgrade process can go wrong, leaving the BIOS incomplete and the computer inoperative.

If the system hangs while probing hardware during boot, or it behaves strangely during install, ACPI may be the culprit. FreeBSD makes extensive use of the system ACPI service on the i386 and amd64 platforms to aid in system configuration if it is detected during boot. Unfortunately, some bugs still exist in both the ACPI driver and within system motherboards and BIOS firmware. ACPI can be disabled by setting the hint.acpi.0.disabled hint in the third stage boot loader:

 set hint.acpi.0.disabled="1"

This is reset each time the system is booted, so it is necessary to add hint.acpi.0.disabled="1" to the file /boot/loader.conf. More information about the boot loader can be found in “Synopsis”.

2.11. Using the Live CD

The welcome menu of bsdinstall, shown in Welcome Menu, provides a Live CD option. This is useful for those who are still wondering whether FreeBSD is the right operating system for them and want to test some of the features before installing.

The following points should be noted before using the Live CD:

  • To gain access to the system, authentication is required. The username is root and the password is blank.

  • As the system runs directly from the installation media, performance will be significantly slower than that of a system installed on a hard disk.

  • This option only provides a command prompt and not a graphical interface.


All FreeBSD documents are available for download at https://download.freebsd.org/ftp/doc/

Questions that are not answered by the documentation may be sent to <freebsd-questions@FreeBSD.org>.
Send questions about this document to <freebsd-doc@FreeBSD.org>.